X-ray project to enhance aircraft safety
28 Jan 2015

Engineers at the University of Southampton (UOS) and University College London (UCL) are developing imaging technology to be used in the design, manufacture and maintenance of current and future generations of carbon composite aircraft.
Funded by a £2.7 million grant from the UK government’s technology strategy board Innovate UK, ProjectCAN will bring together experts from academia, the aerospace industry and X-ray inspection equipment manufactures.
Split in two, the first half of ProjectCAN will be hosted by the University of Southampton’s µ-VIS Centre for Computed Tomography (µVIS) in collaboration with Nikon Metrology.
“Over the following years, [the technology] be developed into a marketable product in order to be made available to aircraft manufacturers
UOS research fellow Thomas Blumensath
This half of the project will seek to develop and test methods for scanning and visualising the insides of large, flat components using X-ays.
To achieve this, the µVIS and Nikon Metrology team will develop both the system for acquiring scan data and the software to reconstruct it into a 3D volume image, allowing manipulation and visualisation using standard software, the UOS said.
“Conventional computed tomography techniques are widely used but are not well suited to image extended flat objects,” said Thomas Blumensath, senior research fellow at the University of Southampton.
“We will be developing an alternative technique, which applies computed laminography (CL) techniques, to overcome the limitations of conventional CT for large, flat components. This will enhance our ability to find defects in large composite parts, such as those which are increasingly used in modern aircraft.”
Blumensath said this technique will help in the production and maintenance processes and will assist in the development of more environmentally-friendly aeroplanes, as well as enhanced overall aircraft safety.
Limitations within traditional CT mean that the scanned components need to be fully rotated, and will yield optimal results only when the X-ray attenuation for each angle is broadly similar, the UOS said.
However, CL systems use a different motion, such as linear translation or limited-angle rotation, to scan components where CT is impossible or ill-suited.
Such a CL system comprises the hardware that positions the sample, source and detector to acquire 2D projection data, as well as an algorithm to reconstruct a 3D volume image from the data.
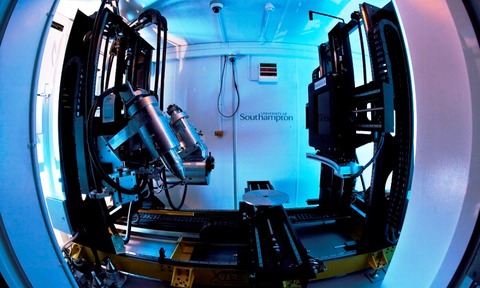
Experts within ProjectCAN will develop both this hardware and software to allow laminographic imaging within the custom Nikon Metrology 225/450kV X-ray scanner already in service in the µVIS centre at Southampton (see image).
Running in parallel to the UOS-led project, a team at UCL, alongside technology transfer firm Axi-Tek, will be developing a backscatter x-ray inspection technique to non-destructively inspect large area composite structures such as wing sections, engine cowlings and fuselage components.
Backscatter is designed to allow the x-ray investigation of the structural integrity of composite materials from a single side of the component, the UOS said.
To enhance this technique, the UCL/ Axi-Tek team is intending to combine the backscatter x-ray with more conventional optical surface inspection.
Blumensath said that after the three-year project is complete, a proof-of-concept system will have been designed and built.
“Over the following years, [the technology] will be developed into a marketable product in order to be made available to aircraft manufacturers,” he said.

